Google turned 20 recently, and while it is surprising to some that Google has been around for so long, I’d struggle to imagine going through a day without using one of its products. Most of these products are heavily relied upon, taken for granted and ‘free’. As a consumer, I use Gmail, Google’s search engine and Google Maps most days. In addition to this in my professional life, I’m heavily dependent on Google Analytics to provide insights into the success of work we do for our digital marketing clients. If tracking software is installed on a website, we usually find that Google Analytics has been chosen. Why not – after all it is free. However, it’s often surprising to me how few installations have been optimised to make the most of this valuable tool.
The following are steps we take every time we install Google Analytics on a website, and once it’s done you can leave the tracking to run and come back at a later date to find helpful insights instead of being faced with a lot of data which is hard to make sense of. However, if you want to find out more about using Google Analytics to measure the success of your digital marketing, book a place on one of our upcoming ‘How to Measure Digital Marketing Success with Google Analytics’ workshops.
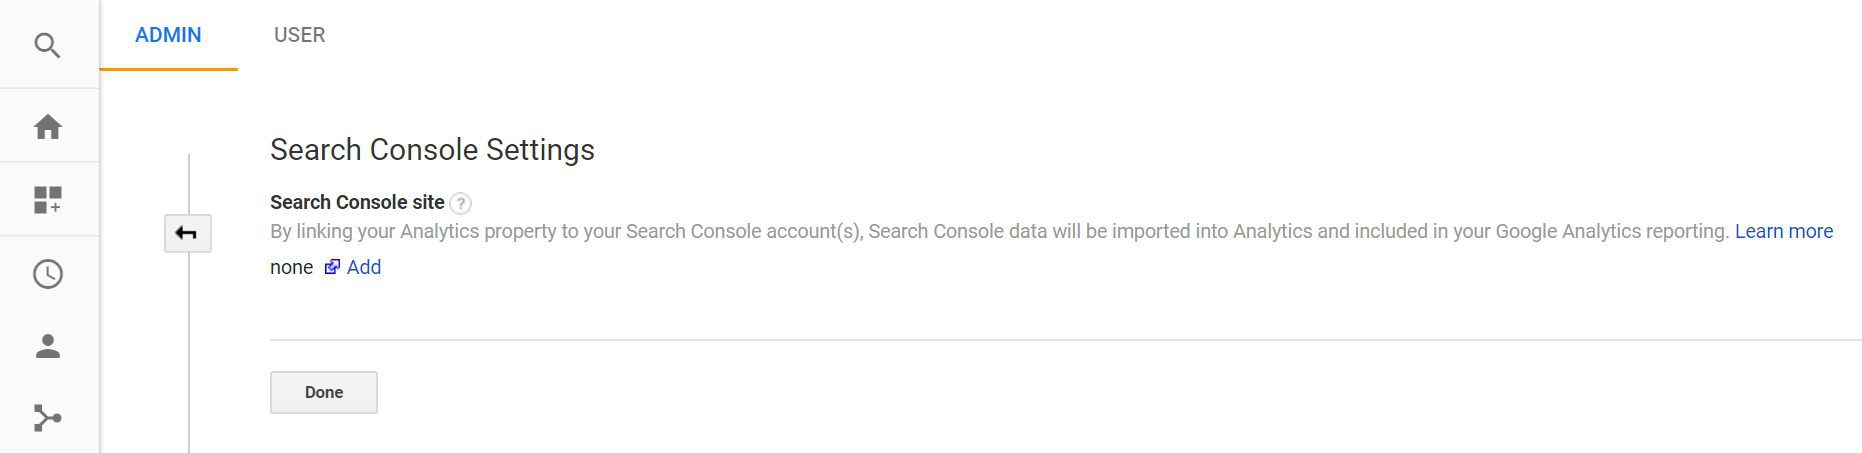
1 Connect your site to Google Search Console
 Previously called ‘Google Webmaster’, Google Search Console gives you a more direct means of communication with Google as you will get information on how your site is indexed in Google. If there are any problems you can also get alerts and you have the option to submit sitemaps and other files giving you some sort of control over how Google lists your website. You can also provide data to Google Search about events, products, or opportunities on your website using ‘Rich cards’, or use data highlighter to share event listings or review ratings. Not every site which has Google Analytics has Google Search Console activated, despite its benefits, so the first step is to set it up. If you already have Google Analytics on the website, this is much easier as you can use your Google Analytics account as your means of verifying ownership of the site, instead of having to add any additional code to the site.
To get started visit the following link. It helps if you’re logged into Google with the same account you use for Google Analytics: https://search.google.com/search-console/welcome
Then follow the steps to add your website to Search Console. Once added I’d recommend submitting a sitemap, and going to crawl > ‘Fetch as Google’ if you find the site is not already fully indexed.
2 Connect Google Analytics to Google Search Console
If a website has Search Console and Google Analytics activated but not connected, this is a missed opportunity as it’s an easy way to get more information in the Google Analytics reports about what search terms lead to traffic from search engines and what devices visitors search from. It’s easy to add too, just go to admin > Property Settings > scroll down to Search Console and select the button ‘adjust search console’. If there is no view selected and you have a high enough level of access, you’ll be able to select ‘add’ and follow the steps to connect your Search Console account.
3 Add a view that excludes your own IP address
If you or your colleagues visit your website a lot, it can skew your data. To avoid this, you can filter your main ‘view’ to exclude traffic from your IP address. However, it’s a good idea to always have at least one view with no filters on it so as to be sure there is some raw data. To create a new view, go to Admin and you will see three columns:
- Account
- Property
- View
Under ‘View’ select ‘View Settings’ and click on ‘Copy View’.
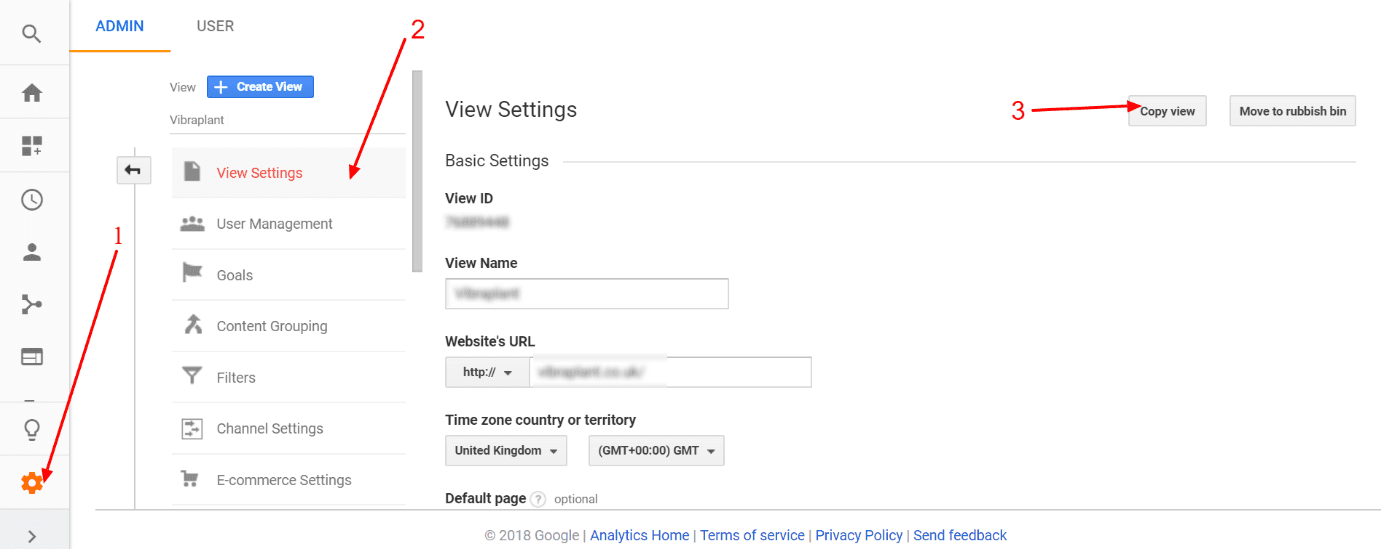
This ensures that if there any settings like ‘goals’ or any of the settings we go through in this article, they are copied over to the new view which we then apply the filter to. Name the view something like ‘IP exclusion view’.
NOTE: you will only see data through this view from the date of creation, so the sooner you can create the filtered view the better, ideally when you first set up Google Analytics.
You will also want to make sure that when you’re viewing Google Analytics in future, you are using this newly created view. To make your new view the default view, go to admin > property > property settings > and 4 option down is ‘Default View’ where you can select which view shows automatically.
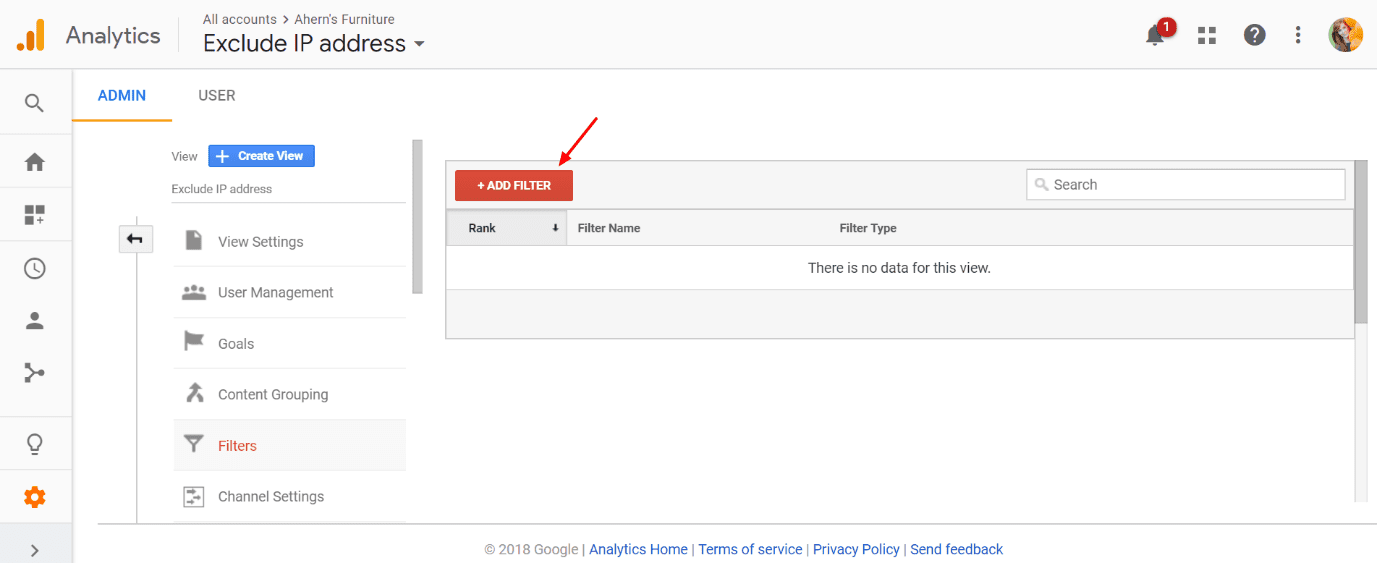
To add the filter, go to view > filters > select ‘add filter’
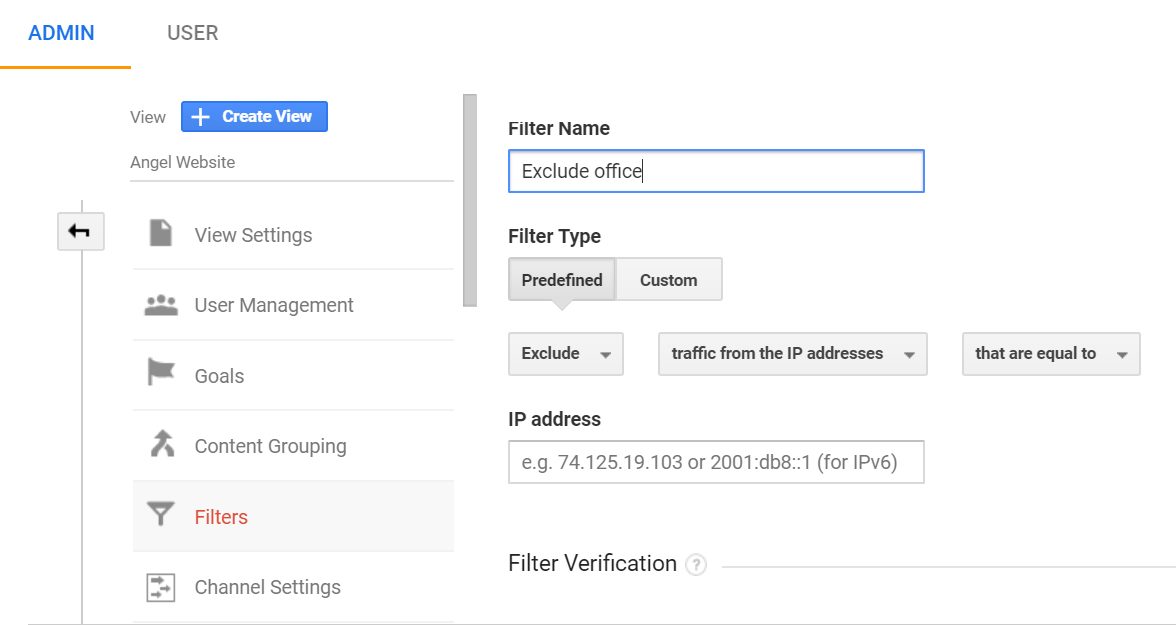
Then leave ‘create new filter’ selected > give it a name like ‘exclude work IP’ > leave the filter type as ‘predefined’ then select ‘exclude’ > ‘traffic from IP address’ > ‘that are equal to’ and add your IP address in the box below. If you’re unsure of your IP address, just google ‘what is my IP address’ and copy the results.
Repeat this process for all relevant IP addresses, including for example devices you use to work from home, your website development company and every branch of your office.
4 Define goals (and ecommerce if possible)
There is a wealth of data available in Google Analytics, but most of it will leave you thinking ‘well that was interesting but I’m not sure what it means to my business’. That’s because, although it automatically tells you about visitor numbers and behaviours, it is down to YOU to define what a successful visit to the website is for your business. If you have an ecommerce website, an obvious measure of a successful visit is a sale, but with other sites you’re left to define success using ‘goals’. Common measures of success are:
- Visiting the contact page
- Downloading a report
- Clicking on an email address or phone number
- Submitting a form
- Visiting another page
Once set up, whenever a visitor completes any of the defined ‘goal’s’ it’s considered a conversion and shows on your reports as such. In most cases it’s not a full conversion/sale, it’s actually a ‘lead’ in business terms so you may need to explain this when sharing reports.
While you may be tempted to go bonkers and add every action which would be considered a ‘lead’, I’d suggest you consider if all actions are equal measures of success? For example, you may feel that a visitor clicking on an email link is a more significant measure of success than downloading a report. However, if you have set up both as ‘goals’ without attributing a value to the goal, they will both be considered as having equal weighting in the Google Analytic reports. It is possible to filter your report views so that you view per goal, but that’s a lesson for another day.
To set up your goals go to Admin > view > goals (this process will need repeating for all views where you want the goals to report).
Then select ‘+ New Goal’ and follow the steps to set up your goal and verify it.
5 Update property and view settings
There are a few things which are basic and obvious to tidy up. To do so, go to admin > Property > property settings and check the following settings:
Default URL prefix
Does your website have a security certificate installed? (I hope so). If it does you will need to update the prefix from http:// to https:// from the dropdown menu before the URL.
Industry category
If you’d like to benefit from industry benchmark reports, select from the drop down the industry which is closest to yours.
Enable Demographics and Interest Reports
This gives you far more data on exactly who is looking at your website in cases where they have allowed this information to be shared. It also means that in combination with other data, like conversions, you get a better idea of the audience on your website that is most valuable. You may want to update your privacy policy after activating this setting.
Update view settings
Next, go to Admin > view > view settings (you will need to repeat this step for all relevant views) and change the following settings:
- Update the time zone to your own from the drop down
- Scroll down further and update the currency to your own
- Select the box under ‘Bot Filtering’ to exclude all hits from known bots and spiders
- Turn on ‘site search tracking’ and under ‘query parameter’ add the right query parameter. If in doubt, go to your site and search for something. In the search results URL you will see the query parameter. This is a letter just before the = symbol which is usually ‘s’ for WordPress websites. This will give you reports on what people are searching for on your website which can indicate that this is an area of interest for your visitors and/or they are struggling to find some content on your website. Based on this your navigation may need an update.
6 Claim your free digital marketing review
If you’ve implemented the above steps, you’ve laid some good foundations, however, there is a lot more to learn when it comes to communicating the success of your digital marketing campaigns to your colleagues and managers. If you struggle to demonstrate the value of your digital marketing activities to your managers, board or even to yourself, claim your free marketing health check and get recommended actions from our team.
You may also like


MD & Head of Digital Marketing
Jessica has worked in digital marketing for over 10 years and has watched it evolve from an experimental marketing option to an essential tool for most businesses. She is driven to help businesses achieve their objectives using the best digital marketing resources available and recognises that each business is different. Jessica devours the latest news about digital marketing and is constantly learning in order to stay ahead of the trends for clients.